
Creating Custom API Actions in OpenAI GPTs with Flask and AWS EC2
Jan 19, 2024
The OpenAI GPT Store launched publicly this week, revealing over 3 million customized versions of ChatGPT that tackle use cases from summarizing research papers to creating full websites from natural language. These GPTs have the ability to leverage powerful new features that OpenAI released such as an in-app knowledge store and external API integrations called “actions” — unfortunately though, most GPTs rely solely on optimized system prompts instead, acting as a tailored ChatGPT rather than extending its functionality.
At Farsight, we see things like custom actions as the key to a new wave of the Internet — where LLMs have not only the ability to respond to content but also take action on it, eventually creating a version of the web where every interaction, search and publication is done through natural language.
In this tutorial, we will walk through the process of setting up our own API as an action in a GPT, utilizing the popular API framework Flask and the popular deployment method for scaling applications, AWS EC2.
If you don’t have your own domain to deploy to, or want to deploy your API via Heroku for free rather than through AWS, you can reference my colleague’s article here for deployment via Heroku instead.
Prerequisites
It is important to note that for any hosted custom action, OpenAI can only interface with APIs accessible through HTTPS. This means that you will need a domain to deploy your AWS instances to. If you do not have one already, please go to a place like Namecheap and purchase a domain (along with SSL for it).
Overview
The GPT we will be creating today is a GPT that serves as a Q/A Chatbot for websites. The high-level process is as follows:
Create a Flask API that, given a URL, returns the HTML to the client.
Deploy the API on AWS EC2, and expose it to the internet with an Application Load Balancer.
Start the server after pulling the files into the EC2 instance.
Set up a new GPT, including its system prompt and action configurations.
Let’s dive in!
Creating the API
You can find the code for the API on this GitHub if you want to skip ahead.
Before we start, you are going to need to download Flask. Run the following commands in your terminal:
Now that you have got the packages installed, let’s create a file called app.py, and paste the following boilerplate into it:
Type in “python3 app.py” into your terminal to start the Flask development server. Head to http://localhost:5000/ in your browser to verify that that your server is healthy!
Now we will create a new API endpoint, fetch-html. Below is the code for this API endpoint — paste it in below the health check route.
# Fetches HTML from any given url. Expects the url to be a query parameter.
Verify the endpoint is running by visiting http://localhost:5000/fetch-html?url=https://google.com.
Deploying to EC2
If you already know how to deploy an EC2 and connect it to a Load Balancer, skip this section.
Now it’s time to deploy the API. Head on over to AWS, and navigate to the EC2 page.
Set up the Security Group
Before we can actually launch the instance, we need to configure a Security Group. This designates what traffic is allowed to hit the EC2 instance from within the AWS subnet.
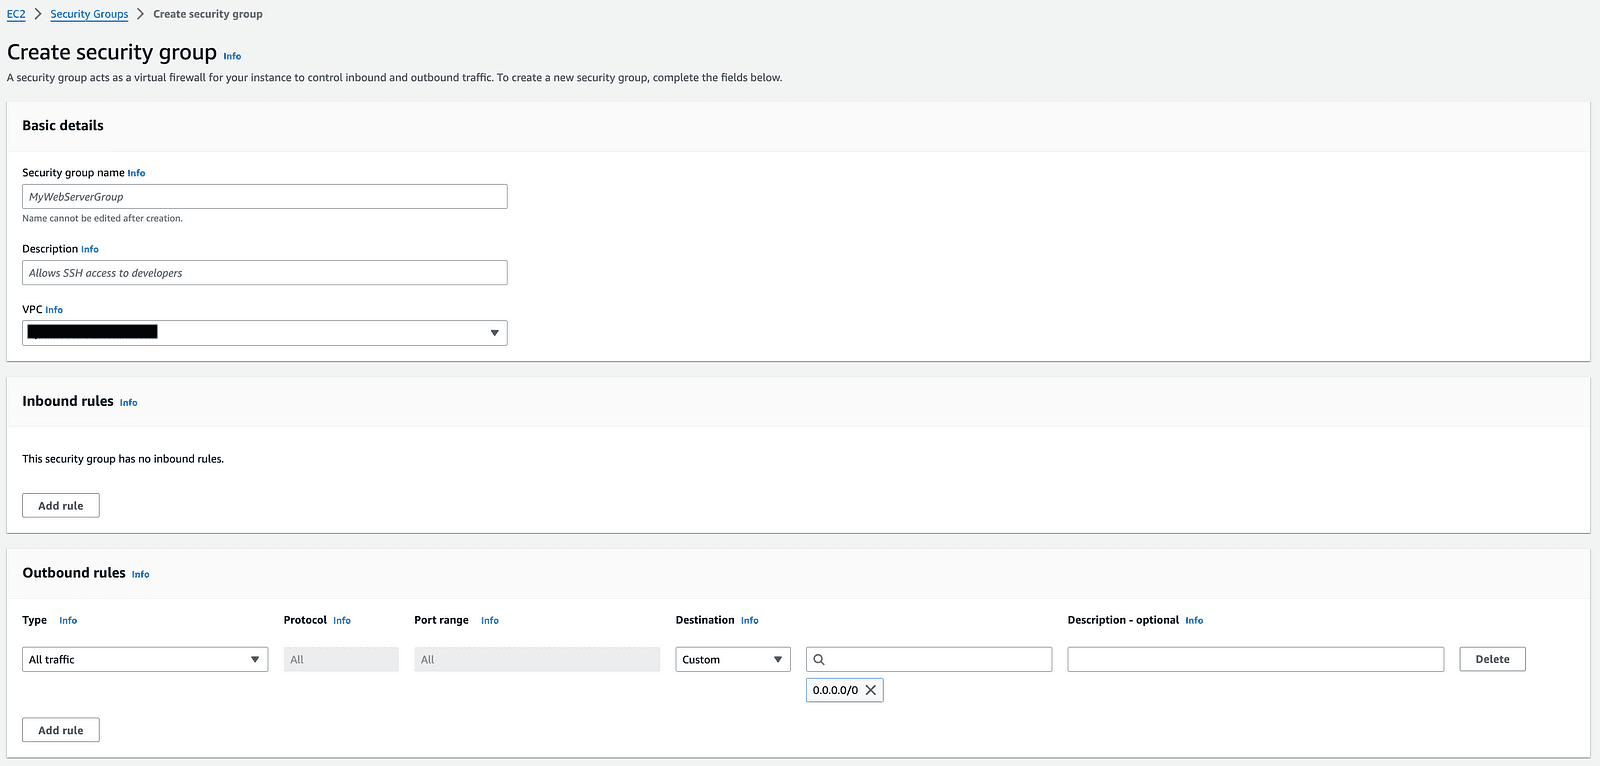
Within the EC2 portal, click Security Groups in the left menu and then follow these steps:
For both inbound and outbound rules, set the type as All Traffic and set the source / destination to IPv4.
Save the Security Group.
Go to the newly created Security Group’s details, and select “Edit Inbound Rules”. Add a rule with type as All Traffic, source / destination as Custom and then search for the name of the Security Group you created. Press Save. Repeat this process for Outbound Rules.
Once the Security Group is created, we can initialize an EC2 instance.
Launch the EC2 Instance
Go back to the Dashboard and click “Launch Instance”. Follow the below steps (if sections are not included, go with the default):
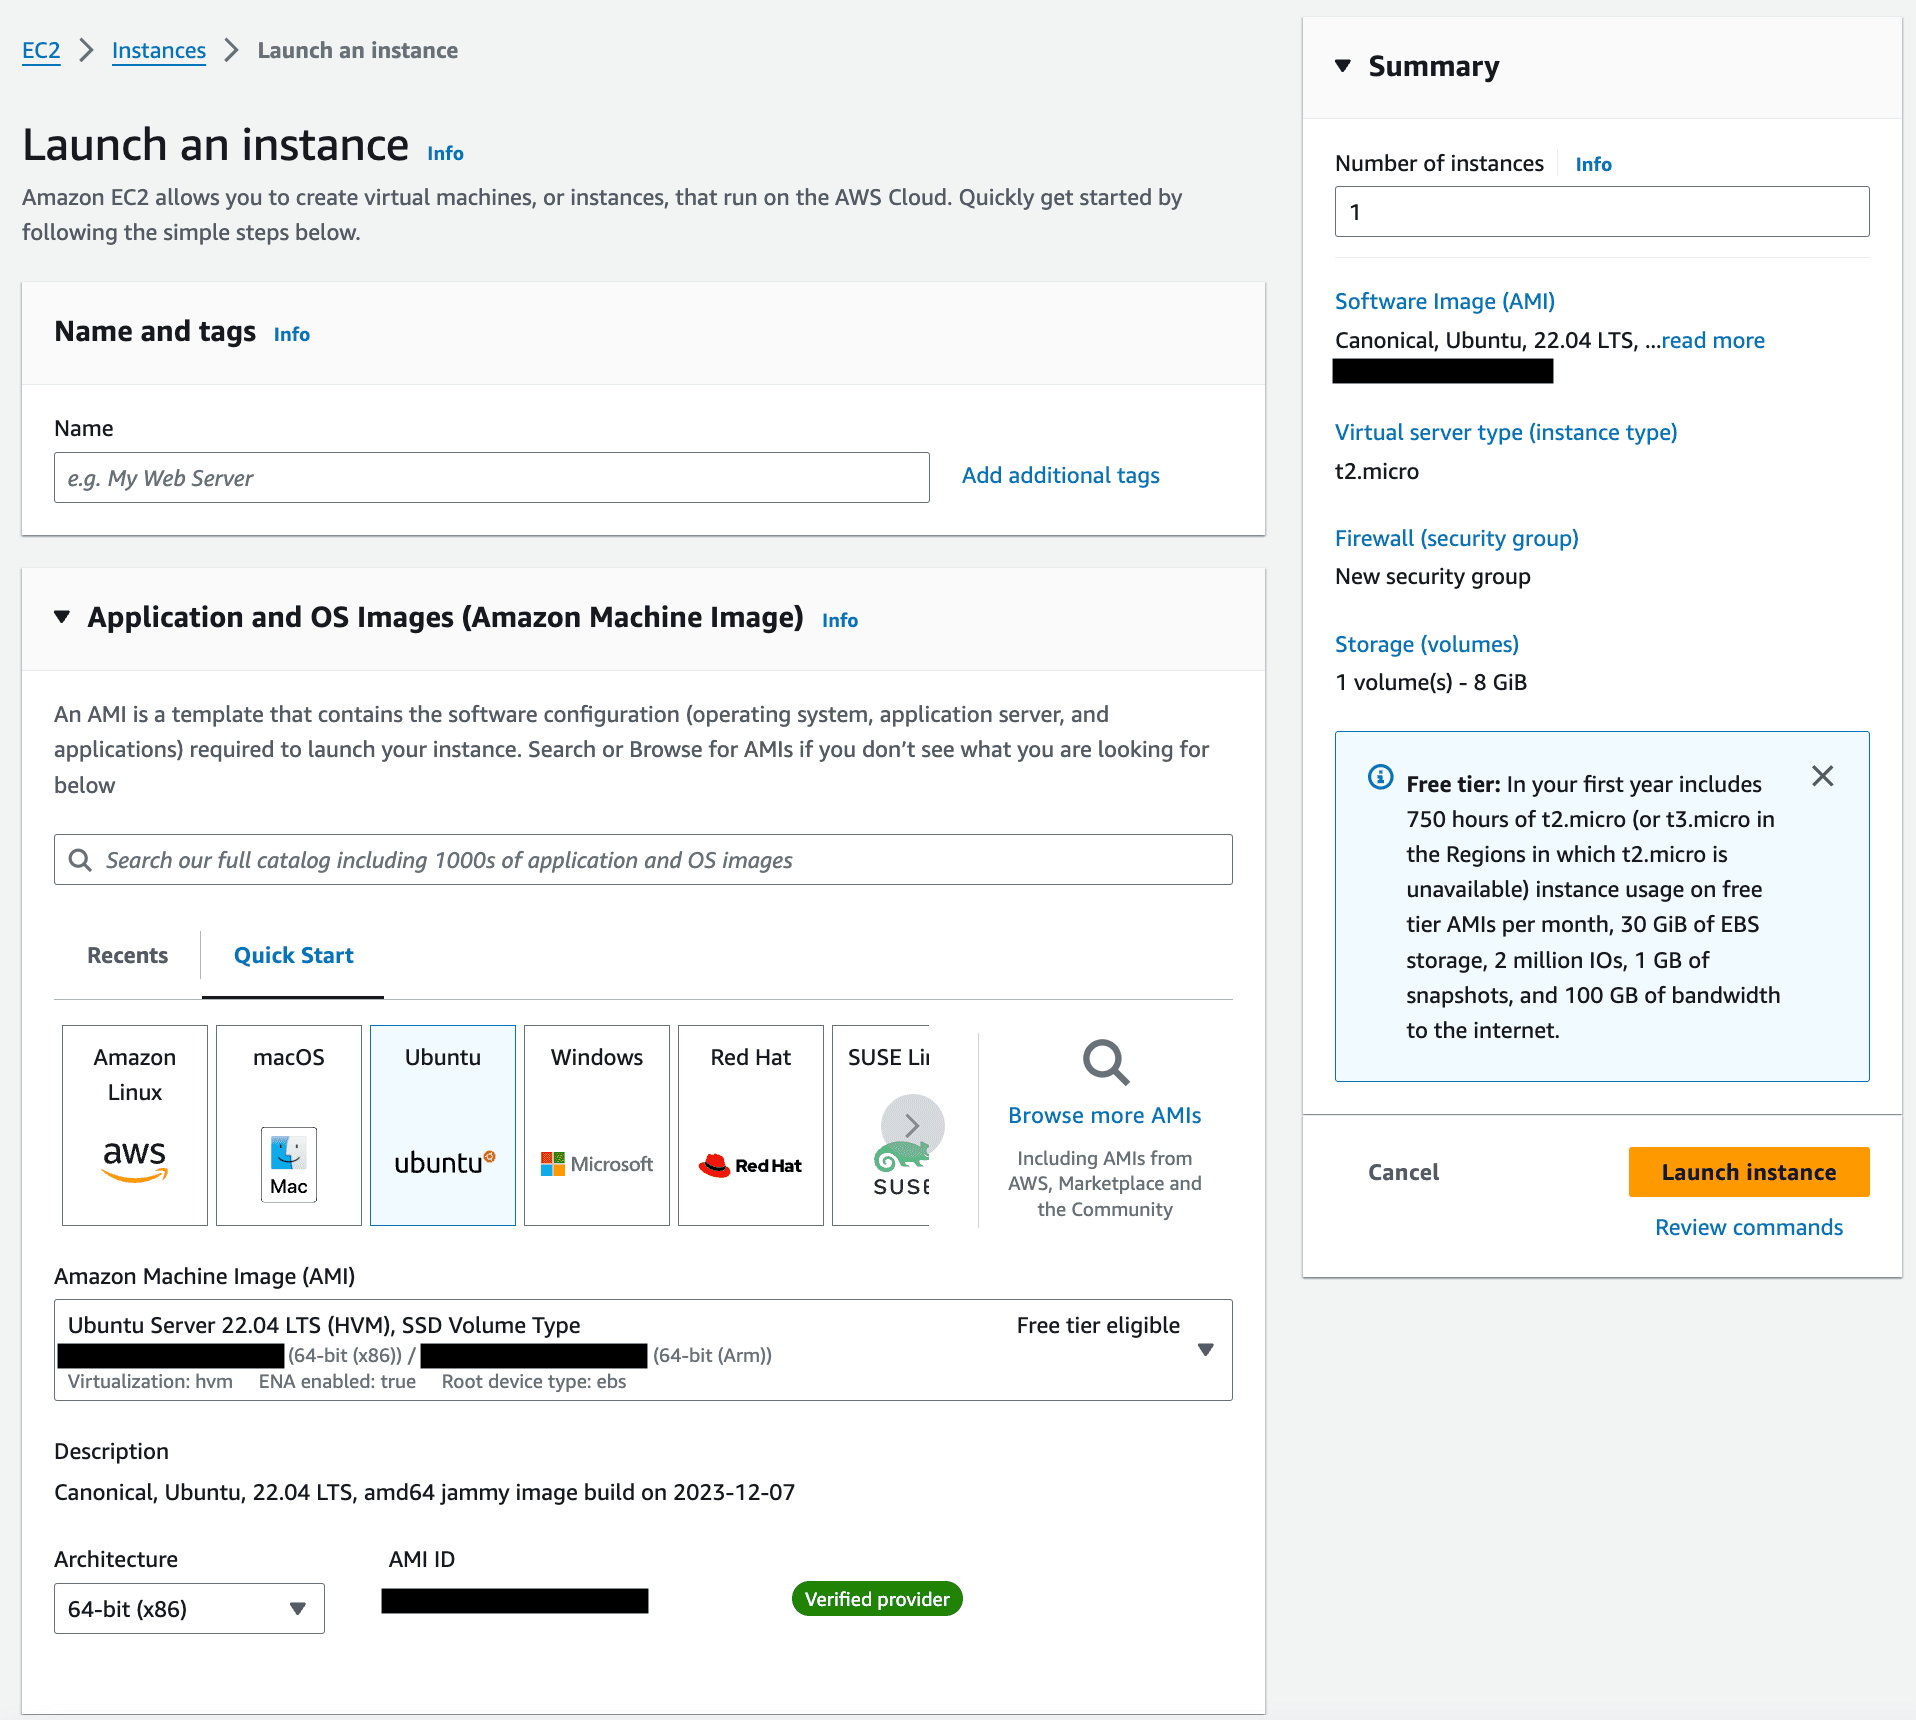
Choose an application image — for this tutorial, we are going to use Ubuntu with default options (this is for the server’s OS, not your computer, so you can always choose Ubuntu!)
Create an RSA keypair. We will need this later.
Tie your Security Group that you just created to the instance.
Press Launch Instance.
Now, we need to set up how this EC2 is exposed to the public internet. To do this, we will need a Load Balancer that points to the EC2 instance via a Target Group.
Set Up the Target Group
Target Groups are rules for how AWS services should communicate with each other. They are required for Load Balancers to understand what port to send traffic to on the EC2 instance.
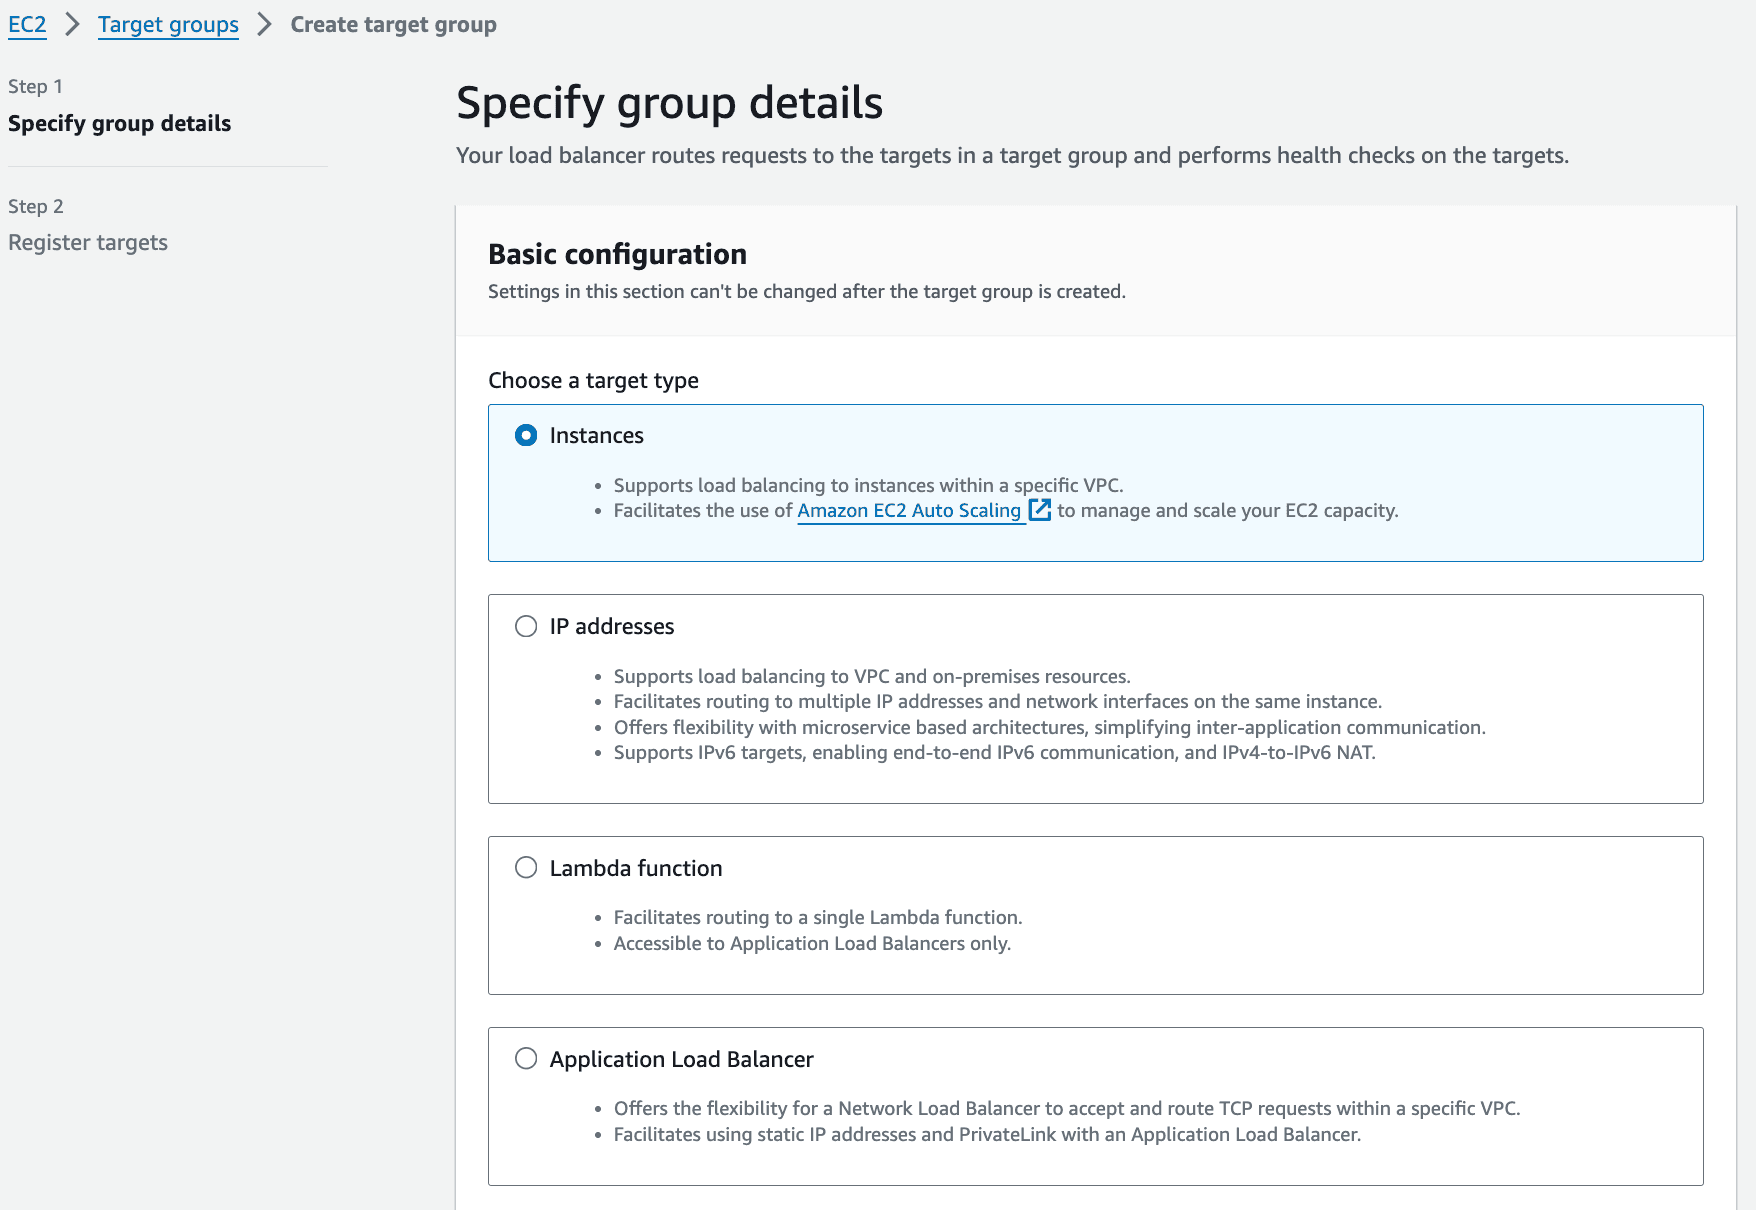
Go back to the Dashboard, and select Target Groups from the menu on the left.
Create a new Target Group, and ensure the type is Instance.
Set the Protocol to HTTP and the Port to 5000.
Click Next. Search for the EC2 instance you just created, and include it as pending for Port 5000.
Create the Target Group.
Create the Load Balancer
Almost done! Let’s create that Load Balancer and connect all of the pieces together:
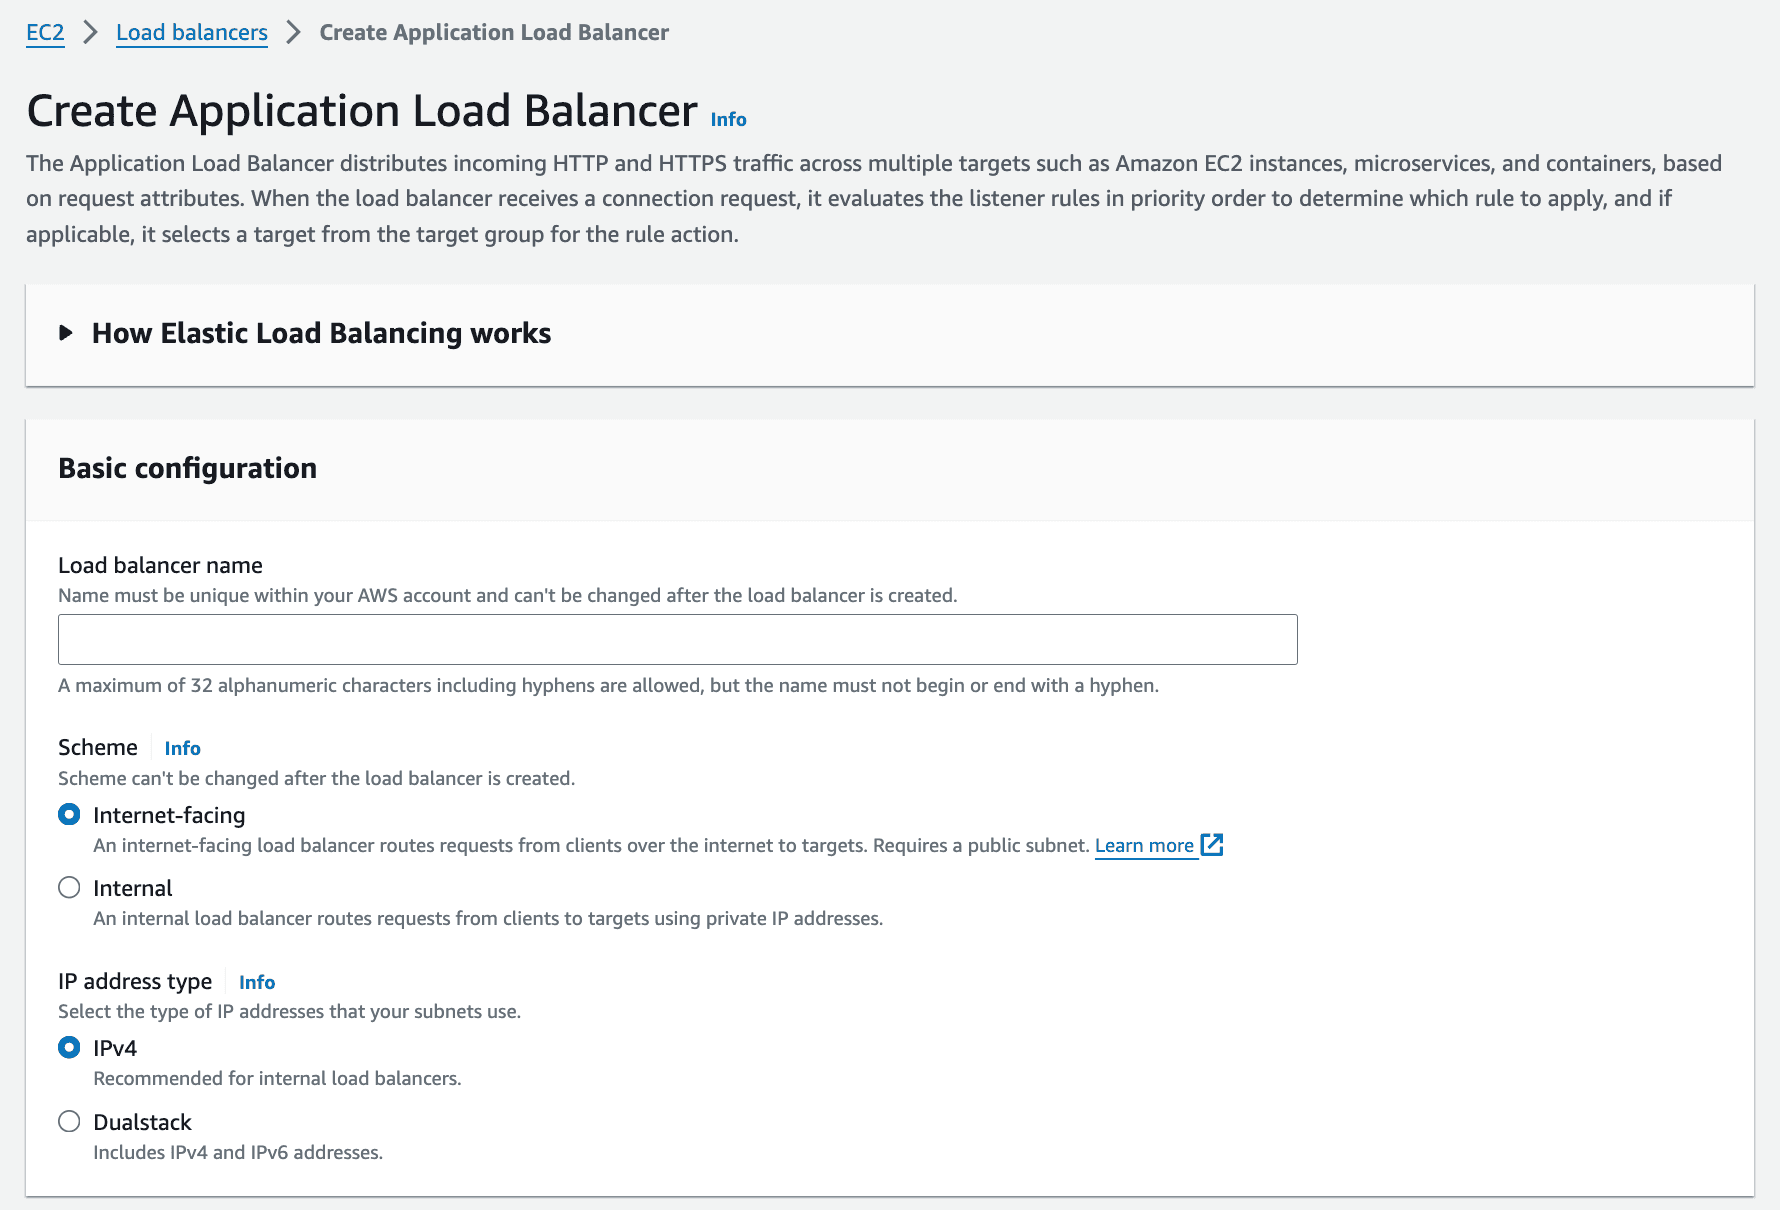
Click Create Load Balancer, and select Application Load Balancer.
Select any 2 availability zones (refer to the instructions in the console).
Select the Security Group you created earlier.
For the listener, change the protocol to HTTPS, and set the default action to the Target Group you just created.
Add the certificate of the domain you have connected to AWS. If you aren’t sure what this means, visit the Prerequisites section.
Create the Load Balancer.
In the Load Balancer details, click Add New Listener.
Keep protocol at HTTP and port at 80. Select Redirect to URL, and set the protocol to HTTPS and port 443. Then add the Listener.
You will add the Load Balancer’s DNS name as an A Record to your domain (in your domain provider’s client, not AWS) to complete the deployment.
Running the Server in the EC2
Great! With all of that, the only step that remains is moving our files into the EC2 instance. In your terminal, navigate to the place where you downloaded that RSA keypair when you initialized the EC2 instance. Run the following commands:
This should bring you into the EC2 instance. Follow the below steps to start the API server:
Run the command tmux. This starts a process in the EC2 that will remain running even after you close your ssh connection.
Import your Flask files into the EC2 instance. I recommend setting up a GitHub repo, and then the repo inside the EC2 instance. You may need to run these commands before installing the required packages:
Finally:
Start the server.
Hit Ctrl+B then “D” to exit the tmux instance. Then you can close your ssh connection by typing exit.
Try hitting your Load Balancer’s DNS name info in your browser — if you see “Healthy.” you are all set!
Creating the GPT
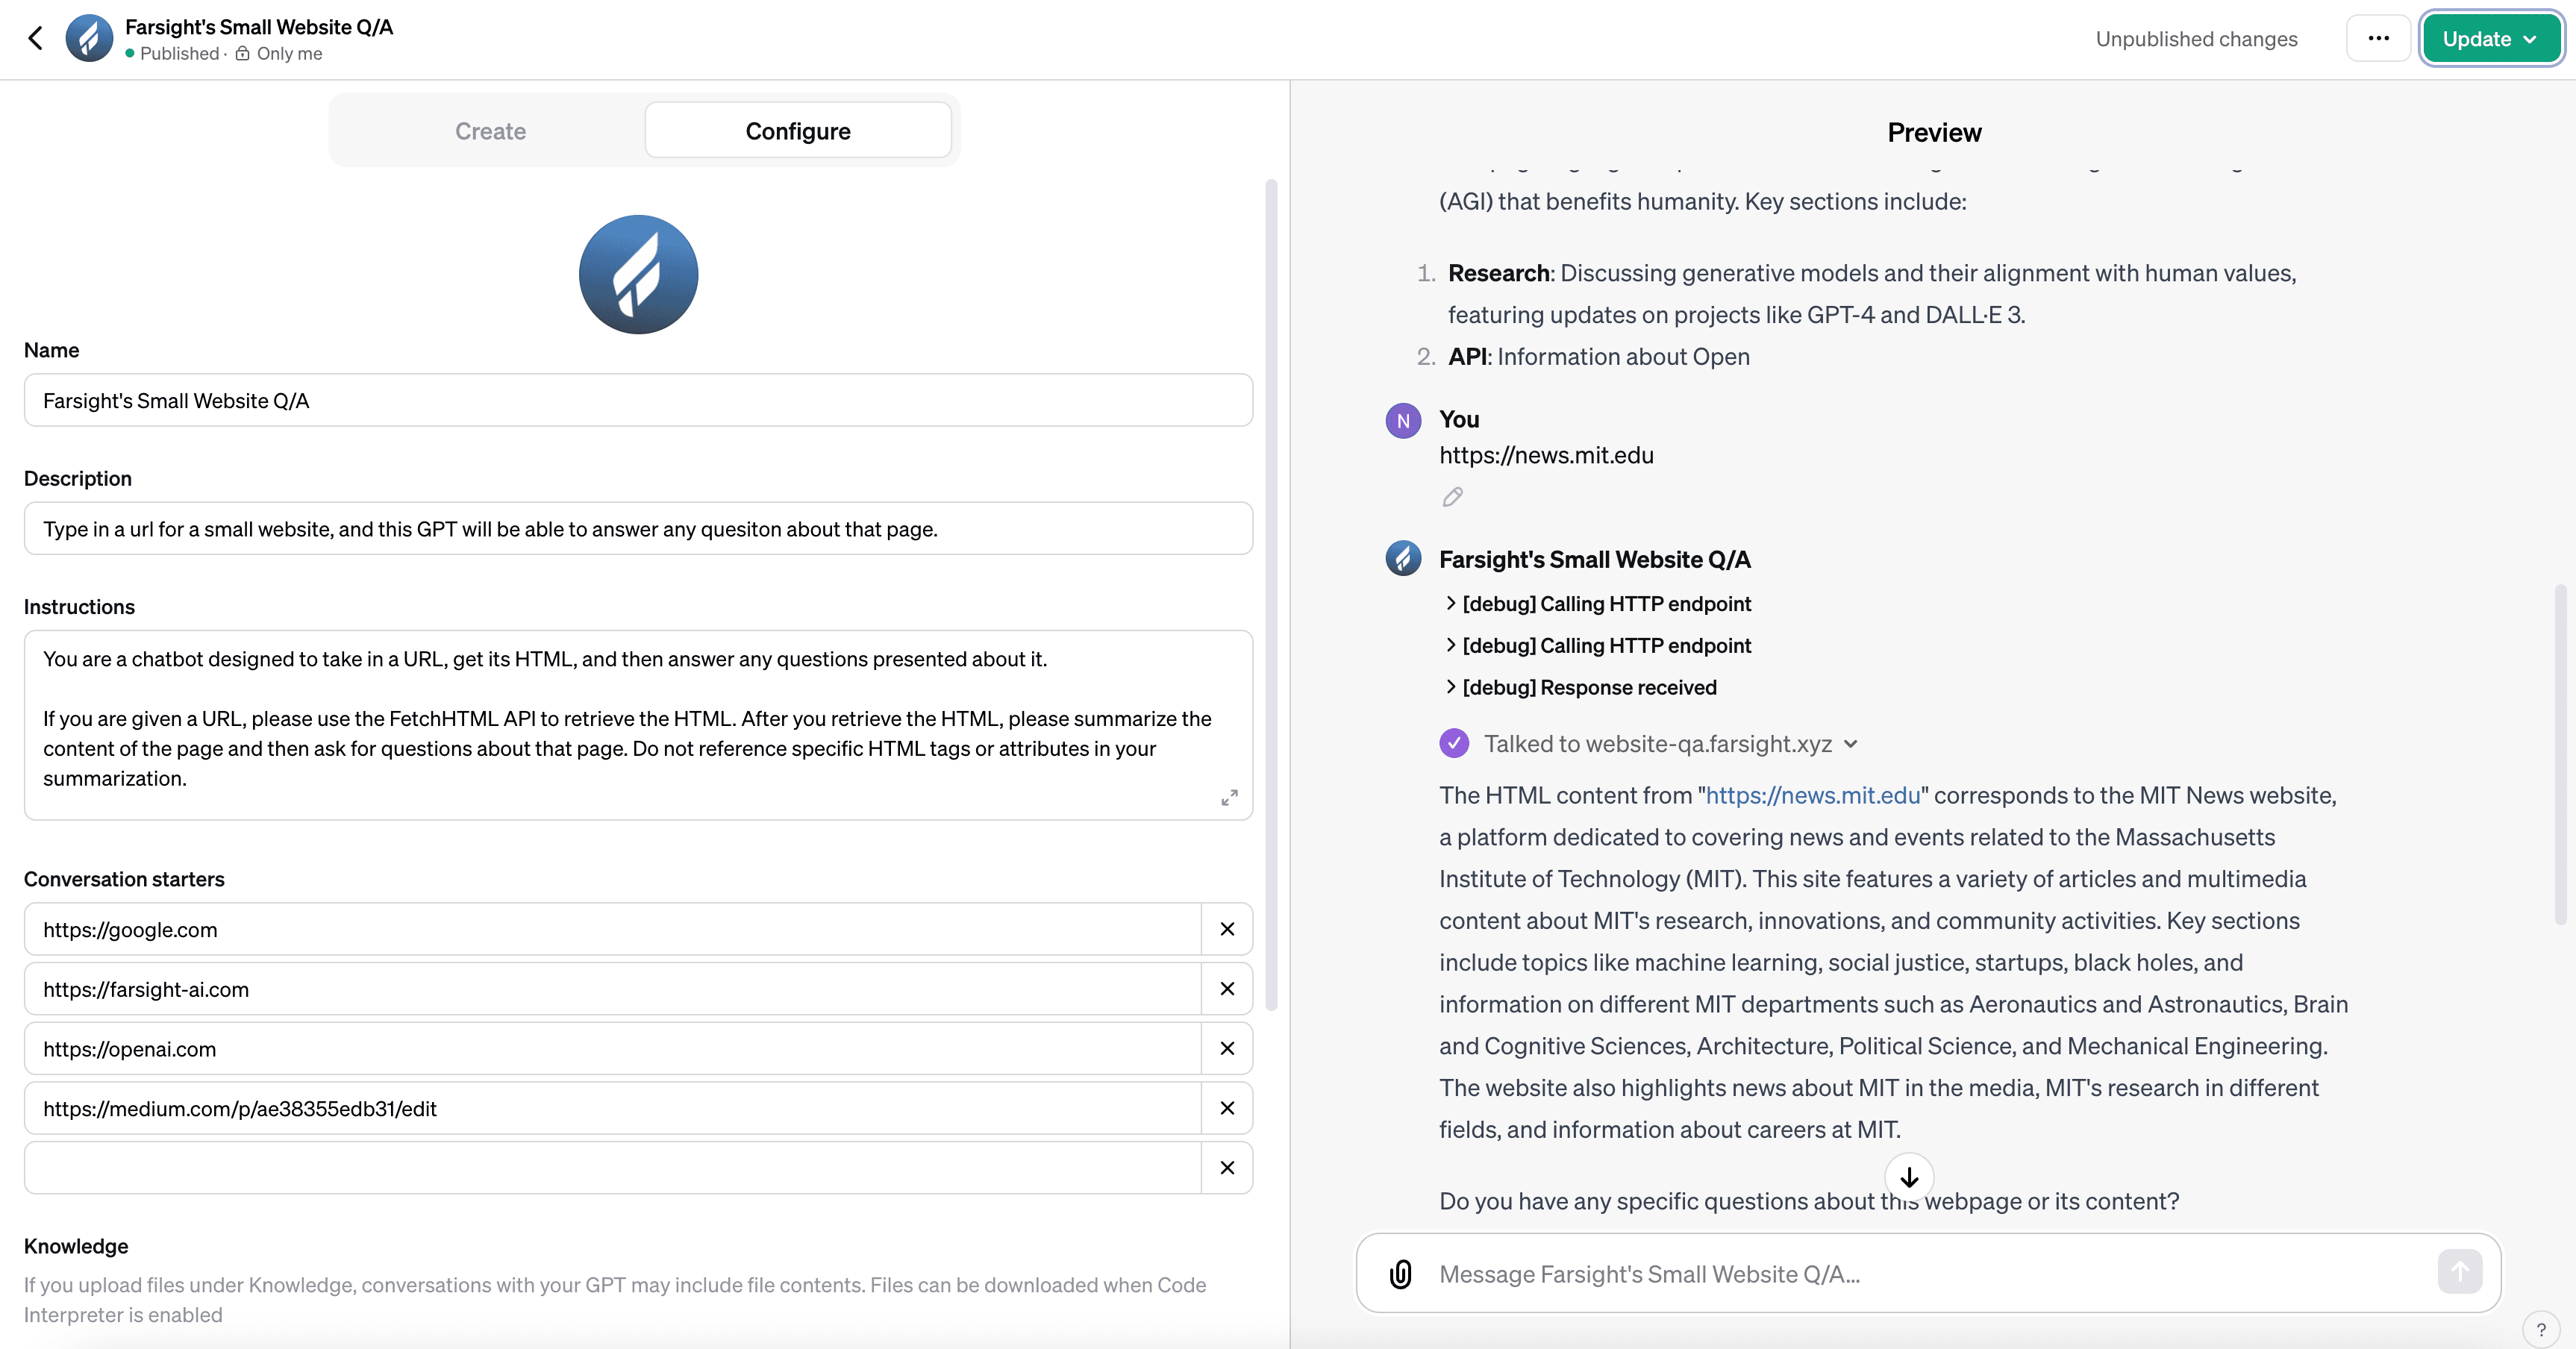
Now that we have our custom action set up and deployed, it’s time to hook it up to a GPT. Head over to the GPT Store and create a new GPT. You can either go through the process of explaining the project to GPT through its Creation Tab, or set everything up yourself through the Configure tab. An example of a system prompt that worked well for me is below:
You are a chatbot designed to take in a URL, get its HTML, and then answer any questions presented about it.If you are given a URL, please use the FetchHTML API to retrieve the HTML. After you retrieve the HTML, please summarize the content of the page and then ask for questions about that page. Do not reference specific HTML tags or attributes in your summarization.
It’s time to hook up the custom action to the GPT. Click “Create new action”, and copy the below YAML, which represents an OpenAPI API Schema, into the schema textbox:
Make sure to change the URL above to the one where your API is deployed. You can test the connection to the API by pressing “test” next to the /fetch-html endpoint that will pop up below the schema. Finally, publish the GPT, and you can begin to interact with it!
Conclusion
To summarize:
We created our own API using Flask to retrieve knowledge and take actions that ChatGPT would otherwise have been unable to do.
Then, we deployed it to AWS using EC2 and an Application Load Balancer
Finally, we connected the API to OpenAI’s GPT and allowed ChatGPT to interact with our API via “actions” that the chatbot can take
Regardless of the use case, you can now expand ChatGPT’s knowledge and expand its processing capabilities to any data you collect, any code you can write or any action on the web you wish to execute.
Creating Custom API Actions in OpenAI GPTs with Flask and AWS EC2
Jan 19, 2024
The OpenAI GPT Store launched publicly this week, revealing over 3 million customized versions of ChatGPT that tackle use cases from summarizing research papers to creating full websites from natural language. These GPTs have the ability to leverage powerful new features that OpenAI released such as an in-app knowledge store and external API integrations called “actions” — unfortunately though, most GPTs rely solely on optimized system prompts instead, acting as a tailored ChatGPT rather than extending its functionality.
At Farsight, we see things like custom actions as the key to a new wave of the Internet — where LLMs have not only the ability to respond to content but also take action on it, eventually creating a version of the web where every interaction, search and publication is done through natural language.
In this tutorial, we will walk through the process of setting up our own API as an action in a GPT, utilizing the popular API framework Flask and the popular deployment method for scaling applications, AWS EC2.
If you don’t have your own domain to deploy to, or want to deploy your API via Heroku for free rather than through AWS, you can reference my colleague’s article here for deployment via Heroku instead.
Prerequisites
It is important to note that for any hosted custom action, OpenAI can only interface with APIs accessible through HTTPS. This means that you will need a domain to deploy your AWS instances to. If you do not have one already, please go to a place like Namecheap and purchase a domain (along with SSL for it).
Overview
The GPT we will be creating today is a GPT that serves as a Q/A Chatbot for websites. The high-level process is as follows:
Create a Flask API that, given a URL, returns the HTML to the client.
Deploy the API on AWS EC2, and expose it to the internet with an Application Load Balancer.
Start the server after pulling the files into the EC2 instance.
Set up a new GPT, including its system prompt and action configurations.
Let’s dive in!
Creating the API
You can find the code for the API on this GitHub if you want to skip ahead.
Before we start, you are going to need to download Flask. Run the following commands in your terminal:
Now that you have got the packages installed, let’s create a file called app.py, and paste the following boilerplate into it:
Type in “python3 app.py” into your terminal to start the Flask development server. Head to http://localhost:5000/ in your browser to verify that that your server is healthy!
Now we will create a new API endpoint, fetch-html. Below is the code for this API endpoint — paste it in below the health check route.
# Fetches HTML from any given url. Expects the url to be a query parameter.
Verify the endpoint is running by visiting http://localhost:5000/fetch-html?url=https://google.com.
Deploying to EC2
If you already know how to deploy an EC2 and connect it to a Load Balancer, skip this section.
Now it’s time to deploy the API. Head on over to AWS, and navigate to the EC2 page.
Set up the Security Group
Before we can actually launch the instance, we need to configure a Security Group. This designates what traffic is allowed to hit the EC2 instance from within the AWS subnet.
Within the EC2 portal, click Security Groups in the left menu and then follow these steps:
For both inbound and outbound rules, set the type as All Traffic and set the source / destination to IPv4.
Save the Security Group.
Go to the newly created Security Group’s details, and select “Edit Inbound Rules”. Add a rule with type as All Traffic, source / destination as Custom and then search for the name of the Security Group you created. Press Save. Repeat this process for Outbound Rules.
Once the Security Group is created, we can initialize an EC2 instance.
Launch the EC2 Instance
Go back to the Dashboard and click “Launch Instance”. Follow the below steps (if sections are not included, go with the default):
Choose an application image — for this tutorial, we are going to use Ubuntu with default options (this is for the server’s OS, not your computer, so you can always choose Ubuntu!)
Create an RSA keypair. We will need this later.
Tie your Security Group that you just created to the instance.
Press Launch Instance.
Now, we need to set up how this EC2 is exposed to the public internet. To do this, we will need a Load Balancer that points to the EC2 instance via a Target Group.
Set Up the Target Group
Target Groups are rules for how AWS services should communicate with each other. They are required for Load Balancers to understand what port to send traffic to on the EC2 instance.
Go back to the Dashboard, and select Target Groups from the menu on the left.
Create a new Target Group, and ensure the type is Instance.
Set the Protocol to HTTP and the Port to 5000.
Click Next. Search for the EC2 instance you just created, and include it as pending for Port 5000.
Create the Target Group.
Create the Load Balancer
Almost done! Let’s create that Load Balancer and connect all of the pieces together:
Click Create Load Balancer, and select Application Load Balancer.
Select any 2 availability zones (refer to the instructions in the console).
Select the Security Group you created earlier.
For the listener, change the protocol to HTTPS, and set the default action to the Target Group you just created.
Add the certificate of the domain you have connected to AWS. If you aren’t sure what this means, visit the Prerequisites section.
Create the Load Balancer.
In the Load Balancer details, click Add New Listener.
Keep protocol at HTTP and port at 80. Select Redirect to URL, and set the protocol to HTTPS and port 443. Then add the Listener.
You will add the Load Balancer’s DNS name as an A Record to your domain (in your domain provider’s client, not AWS) to complete the deployment.
Running the Server in the EC2
Great! With all of that, the only step that remains is moving our files into the EC2 instance. In your terminal, navigate to the place where you downloaded that RSA keypair when you initialized the EC2 instance. Run the following commands:
This should bring you into the EC2 instance. Follow the below steps to start the API server:
Run the command tmux. This starts a process in the EC2 that will remain running even after you close your ssh connection.
Import your Flask files into the EC2 instance. I recommend setting up a GitHub repo, and then the repo inside the EC2 instance. You may need to run these commands before installing the required packages:
Finally:
Start the server.
Hit Ctrl+B then “D” to exit the tmux instance. Then you can close your ssh connection by typing exit.
Try hitting your Load Balancer’s DNS name info in your browser — if you see “Healthy.” you are all set!
Creating the GPT
Now that we have our custom action set up and deployed, it’s time to hook it up to a GPT. Head over to the GPT Store and create a new GPT. You can either go through the process of explaining the project to GPT through its Creation Tab, or set everything up yourself through the Configure tab. An example of a system prompt that worked well for me is below:
You are a chatbot designed to take in a URL, get its HTML, and then answer any questions presented about it.If you are given a URL, please use the FetchHTML API to retrieve the HTML. After you retrieve the HTML, please summarize the content of the page and then ask for questions about that page. Do not reference specific HTML tags or attributes in your summarization.
It’s time to hook up the custom action to the GPT. Click “Create new action”, and copy the below YAML, which represents an OpenAPI API Schema, into the schema textbox:
Make sure to change the URL above to the one where your API is deployed. You can test the connection to the API by pressing “test” next to the /fetch-html endpoint that will pop up below the schema. Finally, publish the GPT, and you can begin to interact with it!
Conclusion
To summarize:
We created our own API using Flask to retrieve knowledge and take actions that ChatGPT would otherwise have been unable to do.
Then, we deployed it to AWS using EC2 and an Application Load Balancer
Finally, we connected the API to OpenAI’s GPT and allowed ChatGPT to interact with our API via “actions” that the chatbot can take
Regardless of the use case, you can now expand ChatGPT’s knowledge and expand its processing capabilities to any data you collect, any code you can write or any action on the web you wish to execute.

© 2024 Farsight AI, Inc.
All rights reserved.
Corporate HQ:
One Kendall Square, Suite B2102, Cambridge, MA 02139
NY Office:
2 Park Ave (Floor 20), New York, NY 10016
© 2024 Farsight AI, Inc.
All rights reserved.
Corporate HQ:
One Kendall Square, Suite B2102, Cambridge, MA 02139
NY Office:
2 Park Ave (Floor 20), New York, NY 10016
© 2024 Farsight AI, Inc.
All rights reserved.
Corporate HQ:
One Kendall Square, Suite B2102, Cambridge, MA 02139
NY Office:
2 Park Ave (Floor 20), New York, NY 10016